

Updated: 14
June 2017
Kilo Newtons, kilo
Watts, kilometres per Hour
So just what do terms used to describe the performance of locomotives and multiple units like Maximum Tractive Effort, Power At Rail, and Continuous Power mean? Here is a guide to such things showing how they influence journey times and speeds.
Some School Physics Revision
A few basic physical relationships link the various factors that influence the acceleration and speed of an object, in this case a train! The following notes explain those relationships.
The application of a force to a mass will cause it to accelerate as governed by one of Newton's laws of motion. The relationship is that the force necessary is the product of the mass and the acceleration rate.
i.e. Force = Mass x Acceleration (1)
Here it is useful to point out that, in strict scientific terms, weight is the force acting on a mass resulting from the influence of the acceleration due to gravity (which is constant for all objects).
The energy consumed in moving an object over a distance is the product of the force required and the distance.
i.e. Energy = Force x Distance
Now, power is the rate of energy usage
i.e. Power = Energy/Time
And speed is the rate of travelling a distance
i.e. Speed = Distance/Time
These relationships may therefore be combined
so Power = Force x Speed (2)
This introduction provides two relationships that will reappear later on.
Units of Measurement
All physical quantities have some unit of measurement assigned to them in order to support these relationships numerically. The standard system of units across the world is the Systeme International (SI), from which many units are known colloquially as "metric". Within this system, the quantification of units is based on 10s, 100s etc, with the main divide points every 1000 (e.g. millimetres, metres and kilometres). Before this system was introduced, various other units were used, often referred to as "imperial", where the links between sub-units were not so mathematically straightforward (e.g. inches, yards, miles).
The rest of this article will use SI units for all but miles, but the following section explains the units for each of the quantities already introduced, and shows their conversion to imperial units which may well be more familiar to many readers.
|
Quantity |
SI Unit
Name |
SI Unit
Symbol |
Imperial
Unit Name |
Imperial
Unit Symbol |
ConversionSI
Unit |
Imperial
Unit (approx.) |
|
Force |
Newton |
N |
Pound
force |
lbf |
1 N |
0.22 lb f |
|
Mass |
Kilogram |
kg |
Pound |
lb |
1kg |
2.2 lb |
|
Distance |
Metre |
m |
Yard |
yd |
1 m |
1.09 yd |
|
Distance |
Kilometre |
km |
Mile |
mile |
1 km |
0.62 mile |
|
Time |
Second |
s |
|
|
|
|
|
Speed |
Metres per
second |
m/s |
Miles per
hour |
mph |
1 m/s |
2.2 mph |
|
Speed |
Kilometres
per hour |
km/h |
Miles per
hour |
mph |
1 km/h |
0.62 mph |
|
Acceleration |
Metres per
second per second |
m/s/s |
|
|
|
|
|
Energy |
Joule |
J |
|
|
|
|
|
Power |
Watt |
W |
|
|
|
|
With the SI unit system, a largely standard means of sub-dividing the units using a prefix is employed so as to keep the figures quoted sensible. These are broken down in intervals of 1000, although some intermediate intervals occur. The following table lists the commonly used prefixes. Note that the one exception to these is the base unit of mass being the kilogram, with a thousandth of a kilogram being a gram and a thousand kilograms being a tonne!
|
Prefix |
Symbol |
Interval |
|
milli |
m |
1/1000 |
|
centi |
c |
1/100 |
|
deci |
d |
1/10 |
|
|
|
1 |
|
kilo |
k |
1000 |
|
mega |
M |
1 000 000 |
Anyway, now we get to the trains at last..
Getting Going
Tractive Effort
Tractive Effort (TE) is the name for the force applied to the rail by the wheel of the train to cause movement. The size of that force is determined by the characteristic of the power equipment installed on the train, and how the driver uses it.
By necessity, this tractive effort is not constant throughout the speed range, and most traction units have a characteristic that looks something like Fig 1.
Fig 1:
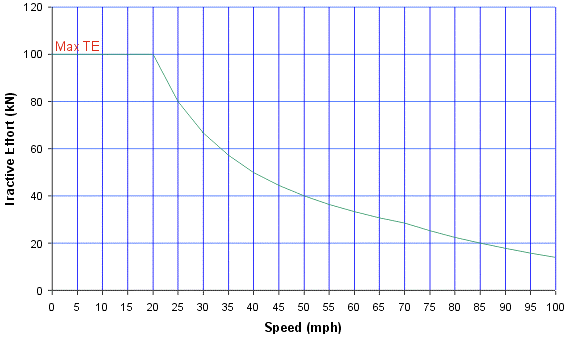
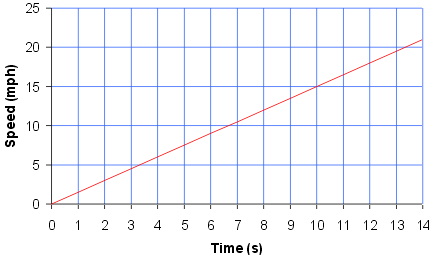
In the example characteristic shown, the TE is constant up to 20 mph, therefore in this speed range, from relationship (1) above, the acceleration will be constant. As a result of this, speed will build up uniformly with time as shown in Fig 2. This is the region of Maximum Tractive Effort.
Fig 2:
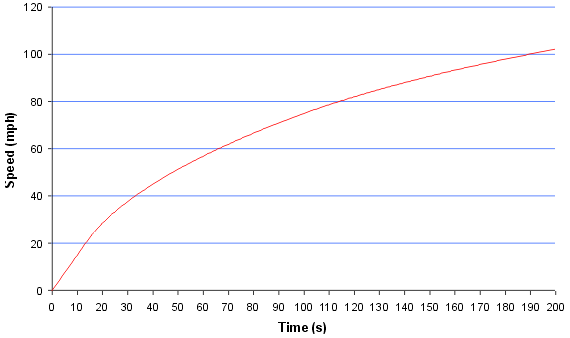
Above this speed, the TE falls, and in consequence the acceleration will start to fall and speed will not build up so quickly. The plot of speed with time, now starts to curve as shown in Fig 3.
Fig 3:
Power
Relationship (2) above says that power is the product of force and speed. Now, if the force, or TE were to remain constant with increasing speed, the power requirement would continue to rise throughout the speed range. Practically, this is not possible as the necessary equipment becomes unfeasibly big and costly, so, when the maximum power capability (or rating) of the equipment is reached, the TE must start to be reduced as speed increases to compensate. This occurs at the "knee" point at 20mph on the above TE-speed curve (Fig 1).
So, in the example given, the maximum TE of the unit is 100kN, and hence the maximum power may be calculated as follows:
Speed in m/s from above table = 20/2.2 = 9.1 m/s
Power = Force x Speed
= 100kN x 9.1 m/s
= 910kW
Fig 4:
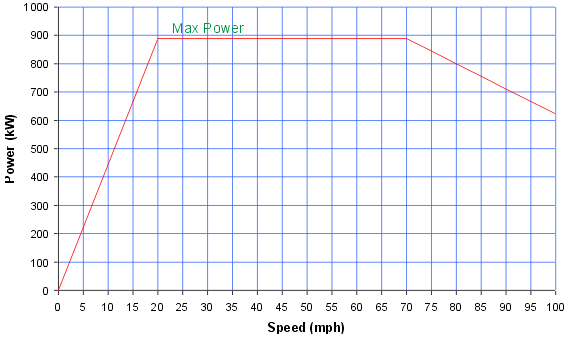
As this is the power needed to actually move the train it is strictly referred to as the Maximum Power at Rail.
In reality, the total power drawn from the supply (whether overhead wire, third rail, or fuel tank) will be greater than 910kW, due to the need for additional auxiliary loads (for lighting, heating, cooling etc) and due to losses in the conversion process, as nothing is 100% efficient.
Further, it is highly unlikely that the equipment is capable of running at this power level continuously, and indeed for many types of service, it would offer little advantage relative to the associated cost. Again, for reasons of rating the characteristic of the equipment will not follow the curve of maximum power to top speed, as indicated by the dip from 70mph onwards in Figs 1 & 4. Consequently a continuous power rating will often also be quoted.
This continuous power rating may be derived from a number of factors based around the equipment characteristic and will including assumptions of proportion of time at a lower tractive effort demand (driver's controller) or coasting.
Train Resistance
So that's how a train is controlled to get it moving, but in practice there are a number of other forces which act to make life difficult.
Friction is always present where motion is concerned, and indeed, there is a certain minimum amount which must be overcome before any movement can take place (often known as stiction!).
Air resistance, or drag, is another important factor which becomes increasingly significant with speed. Pointed noses help reduce this.
These factors are accounted for mathematically using results found by measurement and experience, as theoretical calculation would be far too complex.
Generally train resistance is expressed as:
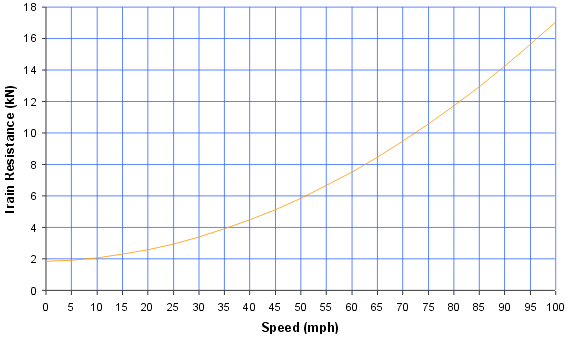
R = a + bv + cv2 where v = speed
The factors a, b and c characterise the particular train, with a being the stiction referred to above, b arises from other mechanical considerations, and c is due to the air resistance.
The train resistance typically looks something like that shown in Fig 5.
Fig 5:
There are further factors to take into account which depend on the route. The main one of these is gradient, which brings in the effect of gravity.
If the train was travelling vertically upwards (i.e. it thought it was the space shuttle at take off), it would incur the full effect of gravity. As explained earlier, the acceleration due to gravity is constant. Mathematically, it is known as g (as in the term g forces in also the best quality intellectual films!) and is 9.81 m/s2.
For example, for a 150 tonne (150 x 1000 kg) train, the gravitational force acting on it is:
Force = Mass x Acceleration
= 150 x 1000 x 9.81
= 1 471 500 N
= 1 471.5 kN
This is the weight of the train.
Now, even the Lickey incline isn't that steep, so the gravitational resistance practically encountered isn't nearly so great. While it's not completely accurate, for the gradients encountered by trains, it suffices to divide the weight by the gradient to obtain the value for this resistance.
So, for example if the above train were climbing a 1 in 200 gradient, the resistance due to gravity would be:
1 471.5/200
= 7.3575 kN
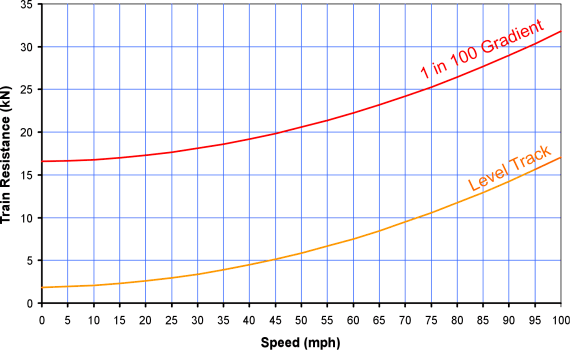
This resistance is constant irrespective of speed and thus simply adds to the train resistance. When the train is going downhill, this figure is subtracted from the train resistance - i.e. it assists the train.
The effect of gradient is seen in Fig 6.
Fig 6:
Now, how do these forces look compared to the Tractive Effort developed by the train
Fig 7:
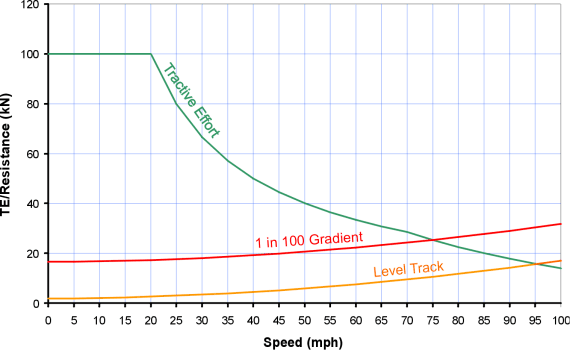
As long as the train produces Tractive Effort greater than the overall train resistance, then it will accelerate. The point at which the two curves cross is when it will cease to accelerate and is known as the balancing speed and is the maximum speed attainable on that particular track. In the example here it is 95 mph on the level, but 75 mph on a 1 in 100 gradient.
The force available to accelerate the train is the difference between the Tractive Effort and the train resistance. Thus it will be realised that an earlier statement about constant acceleration, when the TE is constant, is not strictly correct. In practice the acceleration will reduce as the resistance increases with speed. Additionally it will be noted that train resistance becomes increasingly significant as speed increases.
The following curve shows the actual build up in speed allowing for train resistance (Actual Characteristic) compared with the theoretical build up in speed seen earlier in Fig 3 (Ideal Characteristic):
Fig 8:

Gear Ratio
In all the above discussions, gear ratio has not been mentioned. A gearbox links the traction motor shaft to the train axle in order to step down the rotational speed since motors run much faster than axles! As power = force x speed, and assuming that there are no losses in the gearbox, as the rotational speed at the axle is reduced, the torque at the axle is increased. Consequently, re-gearing is often used as a means of obtaining a revised traction characteristic to suit alternative service patterns without other significant change to the traction equipment.
Wheel Diameter
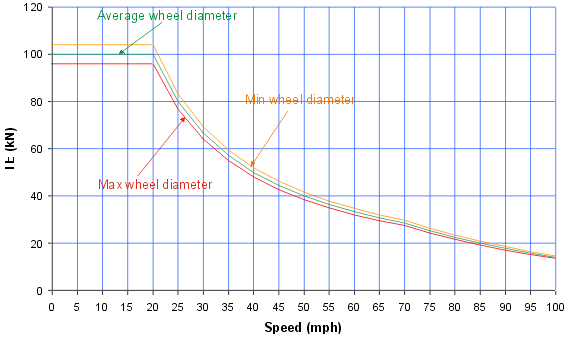
Before finishing, it is also worth noting that this performance will not be maintained throughout the life of the train, since, as the wheels wear down, the tractive effort characteristic will change! A change in the wheel diameter is effectively a change of gear ratio, and consequently as the wheels get smaller the starting TE will increase. However, as this also means that the axle speed becomes higher for any given train speed, the TE at higher speeds will fall off more rapidly. When train performance is being predicted, it is normal to assume the average half-worn wheel diameter.
Fig 9 illustrates the effect of wheel diameter on the TE characteristic.
Fig 9:
With all this information, it is therefore possible to calculate the performance of a train over a given route.
Example Route Performance Calculation - Appleby to Settle
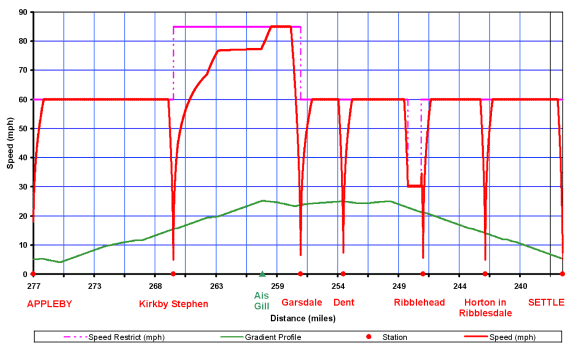
To provide an example of such a calculation illustrating the various influences, a train with the above TE characteristic (based on the average wheel diameter) is shown running over the Appleby to Settle section of the Settle & Carlisle route (Fig 10), with stops at each of the intermediate stations. In this example, the line speed limit has been falsely set to 85mph between Kirkby Stephen and Garsdale so as to illustrate the effect of gradient on speed (see expanded profile Fig 11).
In the following two diagrams, the train speed is indicated by the bold red line, with line speed restrictions indicated by the pink line. The gradient profile is illustrated by the green line, and is not to any scale.
Fig 10:
Fig 11:
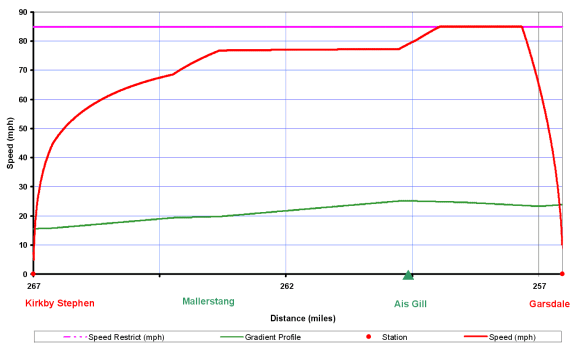
The train is capable of reaching and maintaining the 60mph line speed limit even when climbing the 1 in 100 gradient shortly after departure from Appleby (Fig 10). On leaving Kirkby Stephen (Fig 11) speed increases with the classic curve illustrated in Fig 8, albeit up the 1 in 100 gradient, before hitting a short stretch of less arduous climb around Mallerstang. At this point, the train accelerates more (i.e. speed builds up more quickly) to around 75mph until a further stretch of 1 in 100 is reached. As is seen above in Fig 7, the balancing speed on such a gradient is 75mph and thus speed remains constant until the summit at Ais Gill is reached and a short downhill stretch is encountered allowing speed to increase to the 85mph line limit shortly before braking for Garsdale.
Consequently with such information, journey times may be calculated, although margins and allowances for other factors, such as driving technique, track curvature and wind need to be included.
Footnote
All the above curves have been generated for the illustrative purposes of this article and do not represent any one particular equipment.
Gradient profile information for the Settle & Carlisle route is based on information from "British Rail Main Line Gradient Profiles - Ian Allan.
Tony Woof B Eng C Eng MIEE
Copyright 1999, 2001
